

The V6 in my S3
By Jim E
Published: October 16, 2009
Alpine V6 Conversion
Part 1 – The Dreaded Tunnel Modification
This is the first in a series of articles detailing the steps involved in the conversion of an Alpine to V6 power using the V6 Jose installation kit. Now before we get down to the nuts and bolts of the conversion a piece of advice – start with the very best car you can afford. Believe me, you will be money ahead! Buy that $12k restored Alpine on ebay, sell off the stock drive train and have at it, or even better buy one that is already complete.
I know of a tidy black Series 3 GT that you could be driving tomorrow. Oh well enough advice because you know what they say, “Only a fool gives it, and only a fool takes it”.
So you ask “how do I fit the 2.8 Ford and T5 to my Alpine?” The first order of business of course is to remove the stock engine and transmission. At this point it is a good time to clean the engine bay and tunnel. This is time well spent and will make for a much nicer work area and will reduce the fire hazard when it is time to weld. I use a steam cleaner and purple degreaser, but a pressure washer and some form of degreaser or even a hose will work. Then of course if you bought the restored ebay car you might be able to skip the cleaning bit…
With the stock engine and transmission out of the way and the better part of forty years of oil and dirt knocked off you can get started on your conversion. The key to fitting the engine in the car is the kit-supplied transmission cross member. The cross member gives you a fixed point to work from when it comes time to wiggle the engine around to the sweet spot for the headers to clear the frame and steering; more on that in later articles.
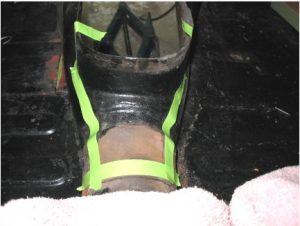
To make room for the engine, first remove the factory engine frame mounts. These are two sheet metal box-like items, one on each side, for the stock rubber motor mounts to bolt to. An easy removal would be to use an air chisel if you have access, otherwise knock them off the old-fashioned way with a hammer and chisel. Grind the weld off smooth and clean any grease and grime off the area so it will be nice and tidy for welding and a spot of paint later. At this point your cross member should look something like the picture below:
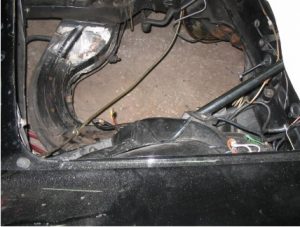
Note the front brake line has been removed. You will need to route this line on the front side of the cross member.
With the stock engine frame mounts out of the way the next step is to make room for the T5. To do this requires the tunnel to be moved over about an inch on the left side and you will open up a new hole for the T5 shifter.
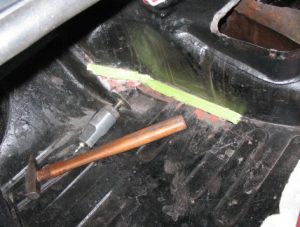
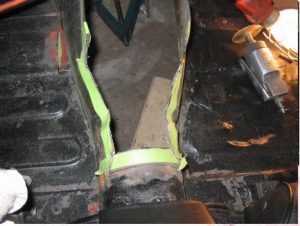
In the above picture I have laid out the cut in masking tape, using two pieces of tape first lay one piece of tape down right up next to the tunnel. Now lay down a second piece of tape so that the tape edge away from the tunnel is about 1 inch over, a bit more than an inch is ok but not less. I also suggest you extend your tape about three inches farther back toward the rear of the car than is pictures above, the above lay out will not allow room to fit and remove the sending unit for the speedometer… ask me how I know this….
Now using a cut off wheel make a cut along the edge of your tape lay out, on the side away from the tunnel. This inch lip will act as a flange to weld the floor to and a guide as to how far over to move the tunnel. So it is a real good idea to grind the paint off and clean up the underside a bit so when you weld this back together it will be nice a clean and allow you to get a good strong weld, not to mention it is a whole lot easier to weld clean metal.
 `
`
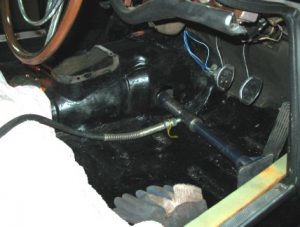
Here you see how I push the tunnel over using a hydraulic ram through the transmission filler hole. A simple small bottle jack used inside the tunnel will do the same thing for you. As you push the tunnel wall over you want the lip or flange we left on the tunnel to go under the floor pan. This may require some whacks with a hammer and some prying, but you want the floor pan on top of the flange. Getting the tunnel moved over will take some moving of the pushing device. I just keep working it up and down the side of the tunnel you push against, distorting and ballooning the tunnel, and actually trying to stretch it farther than it needs to go. The reason for this is because when you let off it wants to go back to the old position. Once you have worked it a bit you will need to nail it down; for this I use sheet metal screws. Push a spot over then run a screw through the floor pan into the flange. Move the pushing device and repeat until it is all over and nailed down.
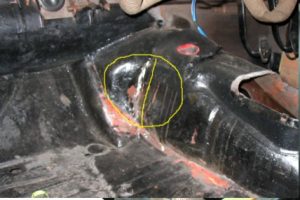
Here is the tunnel pushed over and screwed down to hold it in place. Note the circle – this area needs to be ballooned out a bit and I have found if you make a relief cut just to the left of the line in the circle using a ¼ inch thick grinding wheel this will go much smoother. Make the relief cut then balloon the area with your pushing device. Later you will need to weld a narrow strip of sheet metal over the relief cut, but at this point I do no welding just in case things are not where they should be. By temporarily screwing it down, if something is wrong it is simple to remove the screws and push things around. Welding before fitting the engine/transmission could cause a problem.
Next step is to make a hole for the T5 shifter to stick up through, which means you are going to lose the ashtray.
This is my third car in which I’ve fitted a 2.8 and T5 and have found the above lay out for the shifter hole cut to work well.
Notice the cut left of the tape lay out. The hole will require some bending and straightening of the metal. You need to lose the curve inward and come straight up on the sides. At the back you make two angle cuts and bend the area under the tape. Now you should be ready to test fit the transmission.
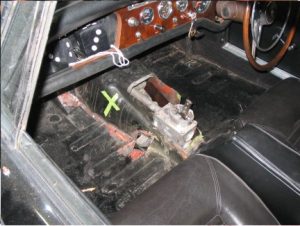
Note the taped X. The transmission fit fairly well but did hit on the tunnel in one spot. You can also see where the speedometer sending unit goes as noted by the hole hacked in the tunnel just past where I ended my slice. I later made up a cover plate that hides this ugly hack.
A word or two about installing the transmission: The car needs to be up in the air a bit, utilizing four jack stands with the car high enough that the transmission, with bell housing attached, will slide under the front cross member. This one had to come back out for a little more tunnel pushing. Once everything cleared the engine went in the first time.
I recommend installing the kit-supplied mounts on the engine and removing the clutch. Removal of the clutch just makes it easier to slide the engine in place. You can now drop the little darling into its new home.
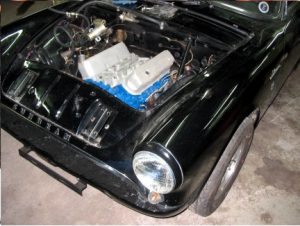
Oh yes! At this point you have a huge smile on your face!
Next time we will cover engine placement, installing the frame mounts, rerouting the front brake line and how to center the transmission tail shaft.
I started with the info in this POST for my 1st Conversion.
Quickly found I needed additional info! So, I started accumulating data to help the next Guy:)
Here is a link that my be of help:
https://docs.google.com/document/d/13vKZ9JhB0vO8p2PrMl1x1qfCxh17xJIg_KCIo7HeFok/edit?usp=sharing_eil&ts=5a51997d